
With Zip you can add multiple Users under your Admin account, set Company Defaults to maintain consistency, and even control various levels of access rights for your user types.
ADDING USERS TO ZIP1. Log in to your Zip admin site (https://newadmin.zipforhome.com).
2. Click the Loan Originator tab.
Note: You will see your information already populating the Results section at the bottom. This is where you would go to modify any of the information that shows on your specific Zip landing page, as well.
3. Click the New User button.
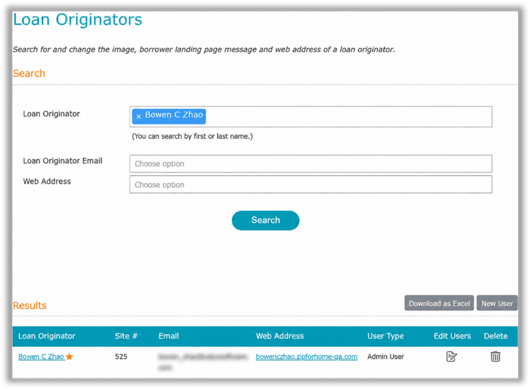
Figure 1: Loan Originators screen and New User button.
4. Complete the Contact section for the User being added.
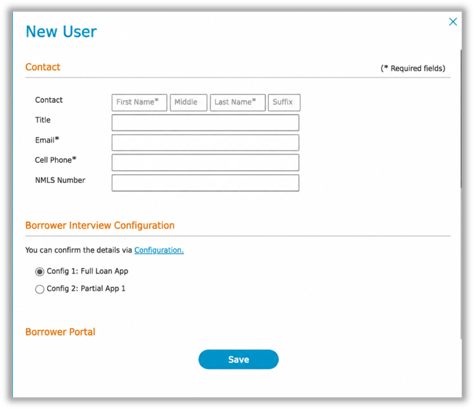
Figure 2: New User Contact section.
Note: If the User is a Loan Originator who will be taking in their own applications, make sure the name entered matches what is in the Loan Originator dropdown within Point.
5. Select the level of access you want the User to have.
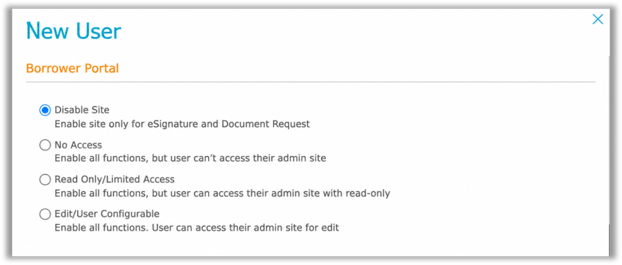
- Disable Site – This option is preferred for Processors and anyone who would only be sending/retrieving Document Requests and INK-it to and from borrowers. They do not get a Zip site, and do not get any access to the Zip admin site.
- No Access – User can receive their own loan applications, send/retrieve Document Requests and INK-it’s, but their Zip site is completely company managed.
- Read Only/Limited Access – User has access to all Zip enabled functions and can access the Zip admin site, but only as read-only.
- Edit/User Configurable – User has access to all Zip features and can access the Zip admin site to edit information specific to their landing page.
6. Enter any State Licenses applicable to the User.
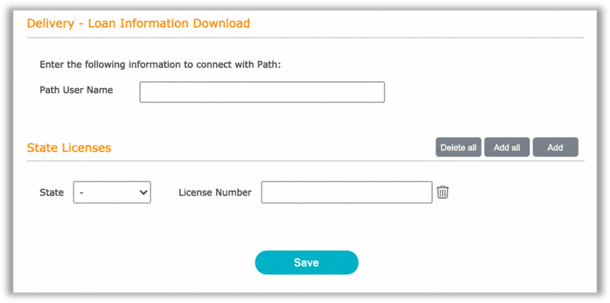
Figure 3: State Licenses and Save.
-
If User is licensed to do business in all states, select the Add all button.
-
To remove any specific states, select that state and click the trash can icon for that row.
7. Click Save.
Setting Up Zip Delivery
Use the Delivery screen to connect Zip to Path. After the connection is saved, applications submitted through the organization's Zip portals are imported automatically into Path.
Use this setup when Path is the organization's loan origination system.
1. In Zip Admin, select Delivery.
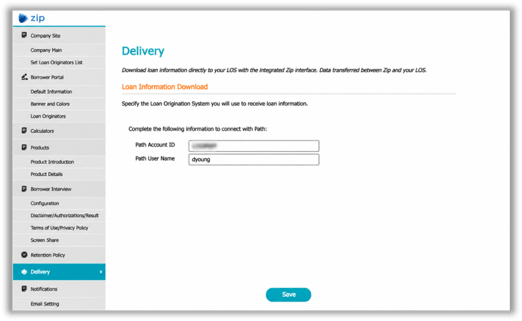
Figure 4: Zip Admin Delivery screen.
2. Under Loan Information Download, enter the Path Account ID and Path Username.
Path Account ID is the organization's Path company account and is shared by all Zip interview portals.
Path Username identifies the Path user account connected to the Zip interview portal. Different Zip interview portals can use different Path user accounts within the same company account.
3. Select Save. A confirmation message appears.
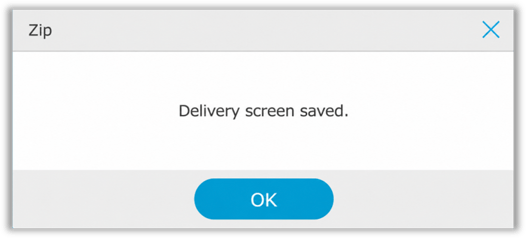
Figure 5: Delivery screen saved confirmation.
4. Select OK.
Add users in Zip Admin, assign their access rights, and state licenses, and configure Zip Delivery to import applications into Path automatically.
