
Condition Setup
To add new conditions or modify existing conditions:
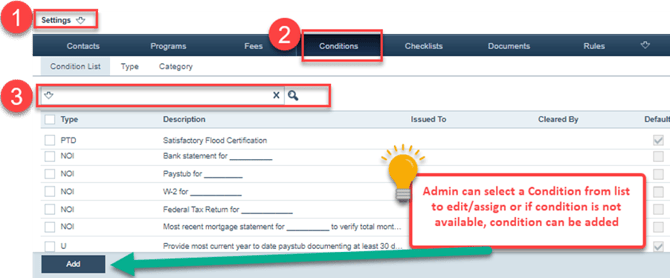
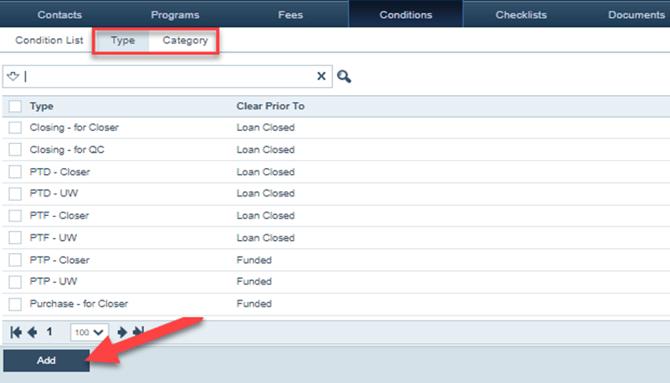
1. Go to Settings > Conditions > Condition ListNote: Only system administrators can access Settings.
Figure 1: Settings > Conditions
-
- Whether the admin adds a new condition or selects an existing condition, the condition’s Profile tab contains detailed information about the condition, as shown below in Figure 2: Condition Profile tab: upper half and Figure 3: Condition Profile tab: lower
Figure 2: Condition Profile tab: upper half
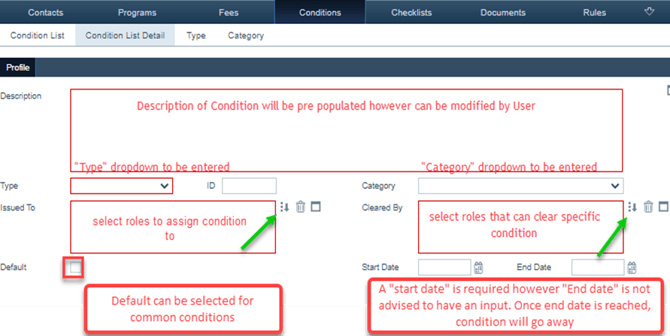
Figure 3: Condition Profile tab: lower half
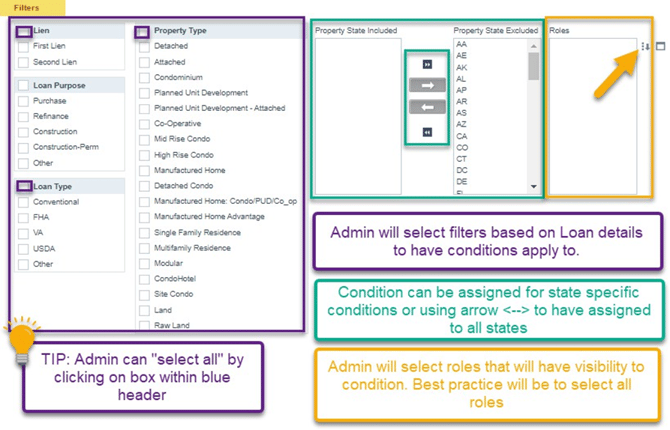
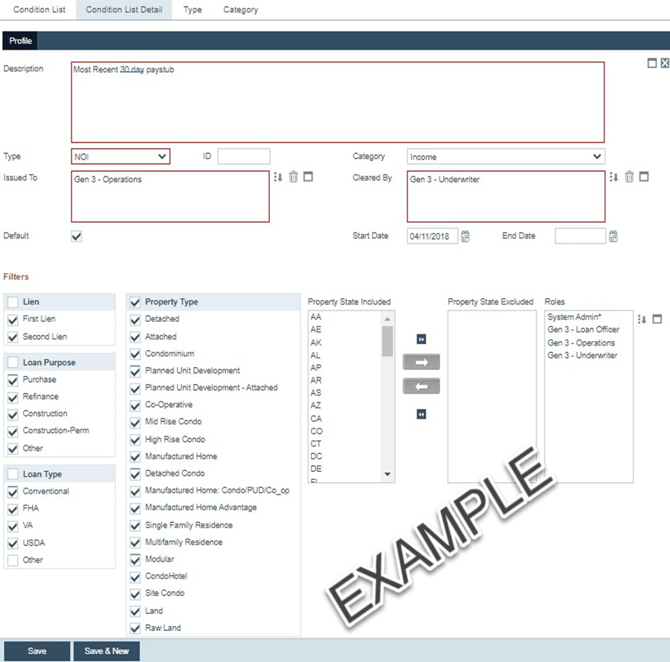
- Shown below in Figure 4: Example of a condition, is an example of a condition that has been set up by the admin, such as the condition’s Type, Category, Issue To, Cleared By, Filters, Roles,
Figure 4: Example of a condition
-
The admin can also add more condition types and categories via the Type and Category screens, as shown in Figure 5: Condition Type/Categories screens. Once new types and categories are added, they will become options to be selected from the Type and Category dropdown menus on the Profile tab of all conditions.
Figure 5: Condition Type/Categories screens
- Once the conditions have been edited or added, the Condition List screen should look similar to the following, as shown in Figure 6: Condition List screen with no missing data, where all columns are populated with data.
Figure 6: Condition List screen with no missing data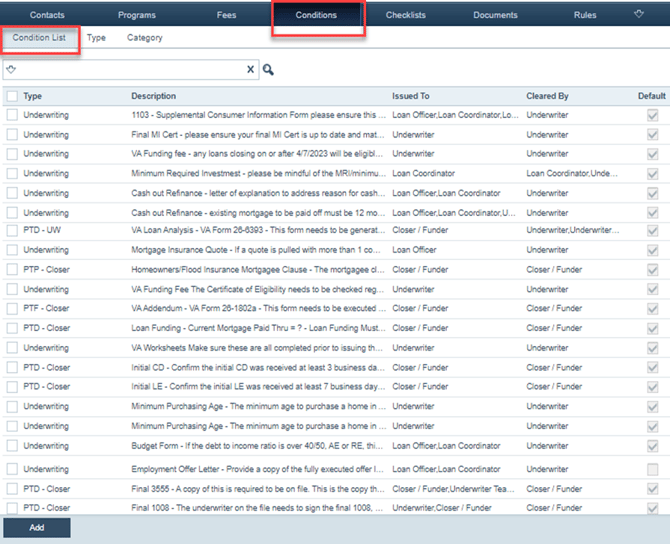
-
Shown below in Figure 7: Condition List screen with some missing data, is the Condition List screen where some conditions are missing some information.
Figure 7: Condition List screen with some missing data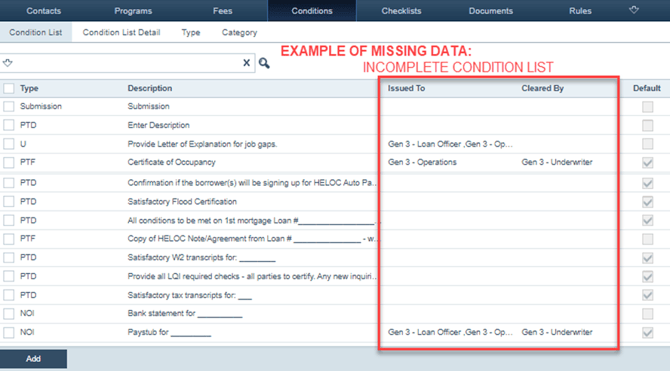
Fee Setup
To add new fees or modify existing fees:
1. Go to Settings > Fees > Fee List
Note: Only system administrators can access Settings. Tip: Ensure that the Enable Custom Fee box is checked.
Figure 8: Settings > Fees
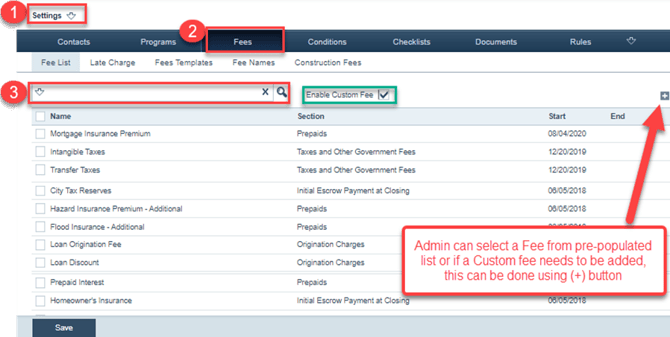
2. The admin can search for an existing fee via the search bar (#3 in Figure 8: Settings > Fees) or add a new fee via the Add
3. As shown below in Figure 9: Fee Profile tab, set up the fee by completing all applicable
Figure 9: Fee Profile tab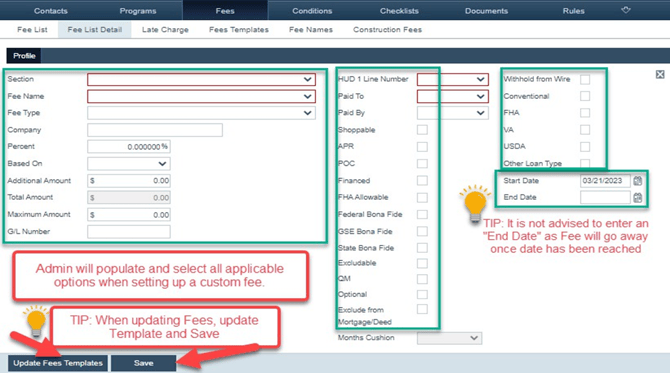
Creating a Fee Template
To create a new fee template:
1. Go to Settings > Fees > Fee TemplatesFigure 10: Settings > Fees > Fee Templates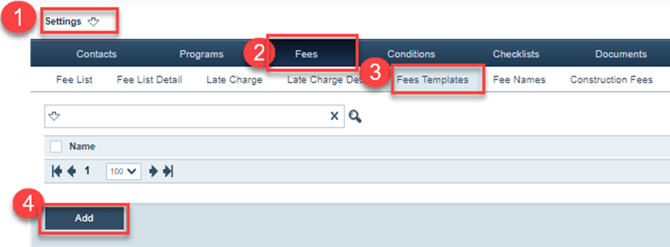
The fee template’s Profile tab is opened.
Figure 11: Fee Template Profile tab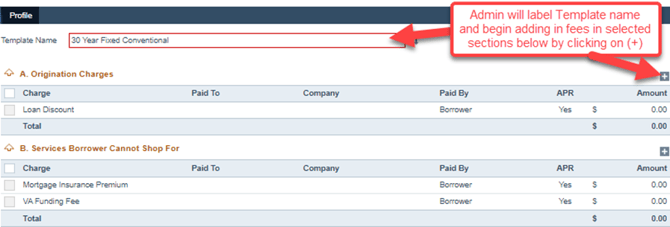
4. Click the add icon (![]() ) that corresponds to the section that you want to add a fee to. The fee’s lightbox opens, corresponding to the section where it was opened from.
) that corresponds to the section that you want to add a fee to. The fee’s lightbox opens, corresponding to the section where it was opened from.
Figure 12: Fee's lightbox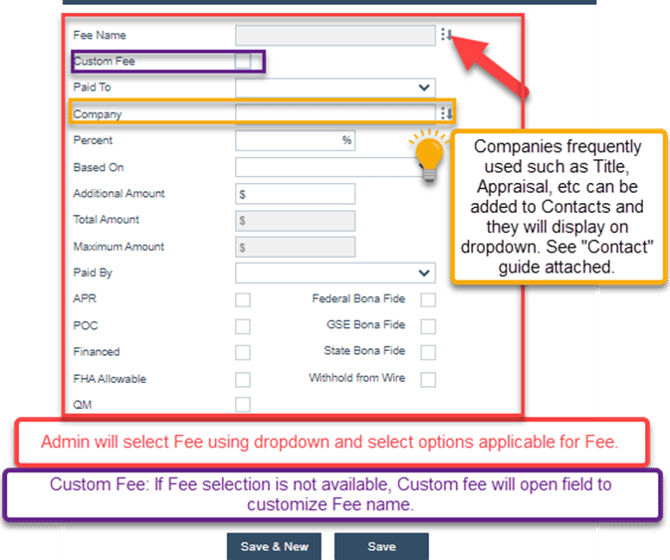
5. Complete all applicable fields in the fee’s lightbox and click the applicable Save
6. Add the rest of the fees you want to include in the
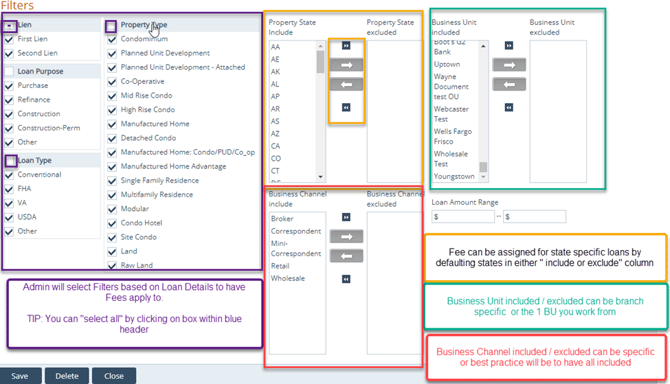
7. Once all fees are added to the template, scroll down to complete the Filters
The template is added to the Fee Templates screen.
Figure 14: Fee template added 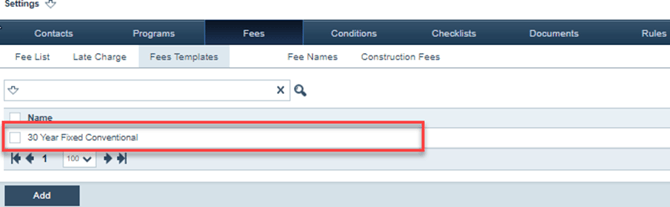
- Below is an example of a template with set Company names, fees with a set amount, and fees with no set amount.
Figure 15: Fee template example 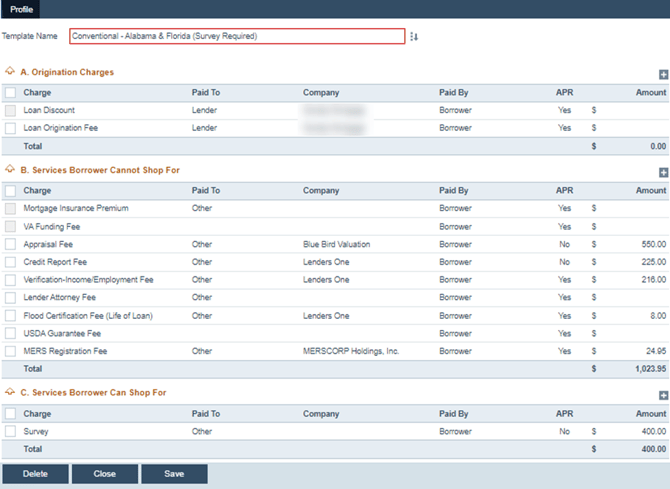
- On the loan side of Path, you can use the newly added fee template in Closing Cost > Fees > Fee Template
Figure 16: Fee template used on the loan side 
Dashboard Setup
To create a dashboard:
1. Go to Settings > Dashboards > ListNote: Only system administrators can access Settings.
Note: The admin needs to set up different dashboards for different roles.
Figure 17: Settings > Dashboards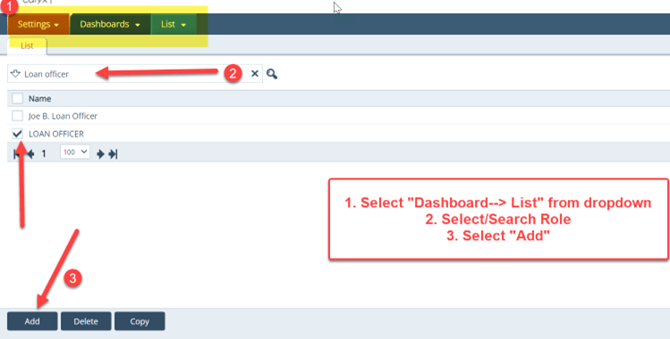
2. Click Add, which opens the new dashboard’s Detail screen
Figure 18: Dashboard Detail screen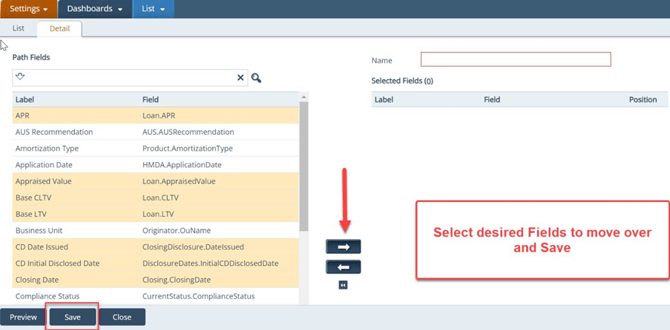
3. On the left in the Path Fields table, scroll through the list and click on the fields you want to include in the dashboard
4. After the fields are clicked on and highlighted, click the right arrow to move the selected field to theSelected Fields table.
5. To preview how the dashboard will be displayed, click the Preview
6. After you have finished setting up the dashboard, click Save and then Close.
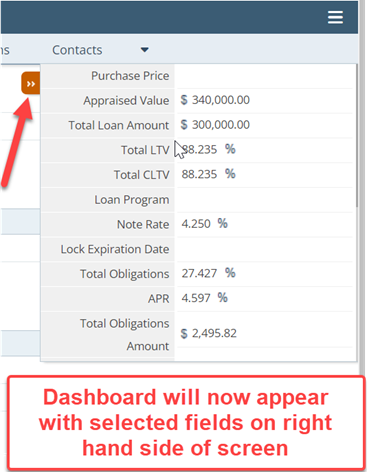
Figure 19: Dashboard in action
Pricing Configuration/Setup
1. Pricing Setup
-Adjustments
As the Path system administrator, you have access to Settings > General Settings.
1. Go to Settings > General Settings > Secondary Marketing > Adjustments. 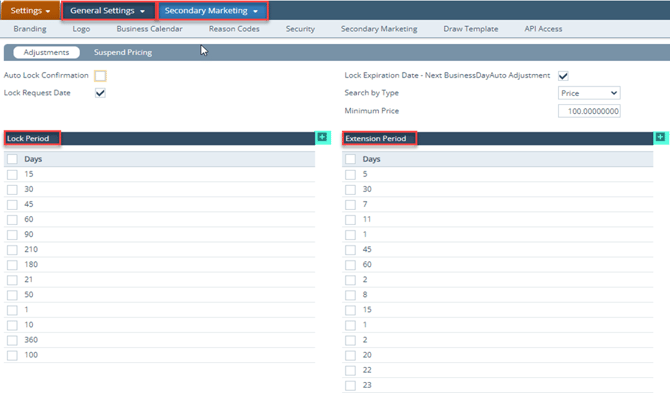
2. In the Search by Type dropdown, select Price or Rate as the default way in which users will search for pricing.
3. Enter the default Minimum Price.
Note: The default Minimum Price value can still be modified by users, same for the Search by Type dropdown default.
4. Select the Lock Expiration Date – Next Business Day Auto-Adjustment checkbox to ensure that if lock expires on a weekend or holiday, then it will roll over to the next business day.
5. In the Lock Period and Extension Period tables, enter the duration periods for the lock period and extension period, respectively, by clicking the add icon (). After these periods are entered in their respective tables, users are able to select them.
6. Enter options for users to select from, in the Non-Correspondent Buy Side Adjustments, Sell Side Adjustments, and Correspondent Buy Side Adjustments tables, by clicking their corresponding add icon ( ).
7. To delete an option for the above tables, select its checkbox and click Delete.
-Suspend Pricing
1. Go to Settings > General Settings > Secondary Marketing > Suspend Pricing.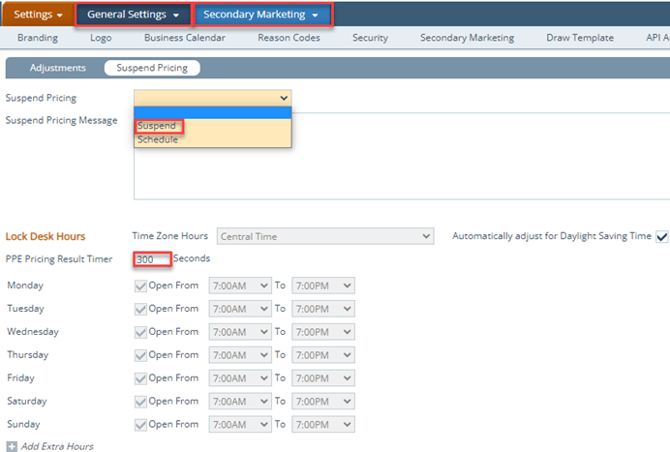
2. As the system administrator, you can also schedule or suspend the Lock Desk hours, via the Suspend Pricing dropdown.
3. If you are using a PPE (product and pricing engine) you can also set the duration (seconds) when pricing results are available before they expire and have to be re-priced, in the PPE Pricing Result Timer field.
2. Business Unit Configuration (PPE Only)
1. Go to Configuration > Business Units.
2. Select/create a business unit to open its Profile tab. 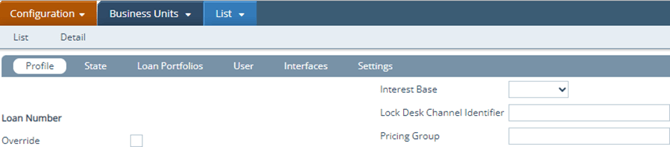
3. Enter the Lock Desk Channel Identifier (green row) and the Pricing Group (red row).
Note: These should be provided by LoanScorecard or from the user’s list provided by the Path product team, as shown below. 
4. Select from the following checkboxes regarding pricing and lock options. 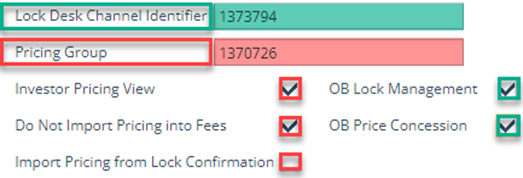
- Investor Pricing View – Legacy pricing option (no longer applicable)
- Do Not Import Pricing and Fees – Prevents Loan Discount/Credit from showing on the Closing Costs > Fees tab.
- Import Pricing from Lock Confirmation - Imports price/lock from the lock side to the loan side.
Note: User will still need to click the Copy from Lock to Loan button on the Lock > Summary screen, to copy lock data to loan data (from lock side to loan side).
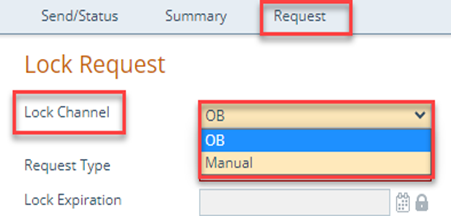
5. If users are locking with Optimal Blue, then check the following- OB Lock Management – Will enable the OB Lock Request and OB Change Request History buttons on the Lock > Request screen, as shown below.

- OB Price Concession – A prompt will appear after selecting the OB Lock Request button, asking if user would like to do a price concession, which can be done at another time (after lock is confirmed), so uncheck this box if users should not be asked upfront.
Note: Ensure that you enable these buttons in Configuration > Roles > Screens > Loan > Lock > Request, for the role that users utilize to perform lock request through OB. 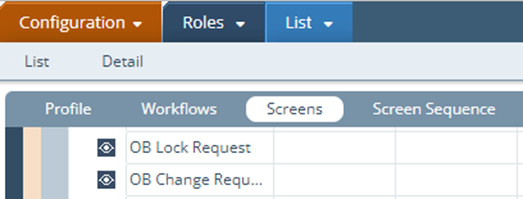
Note: The OB checkboxes will also give users the choice to switch between Manual and OB lock channels if needed.
3. User Configuration
1. Go to Configuration > Users.
2. Select/create a user.
3. If the user utilizes PPE, enter their lock/pricing credentials in the Lock Pricing Configuration section.

- Credentials requirements:
- LoanScorecard - Pricing ID
- Mortech - Pricing Group, Pricing ID (usually email address)
- OB Lock - Lock Desk Group, Lock Desk User ID, Lock Desk Username
- OB Pricing - Pricing Group, Pricing ID, Pricing Username
4. Lock Status Setup
The following lock statuses and sub-statuses must be entered in Settings > Loan Statuses. 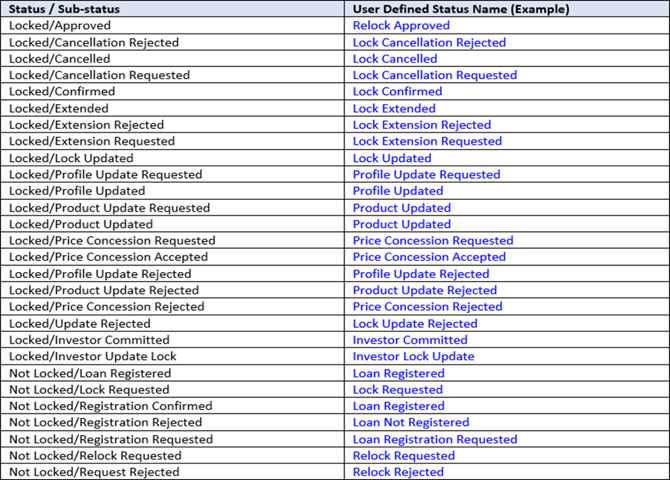
5. Notification Setup
Add notifications for each lock status to notify recipients of lock requests/confirmations/rejections.
1. Go to Settings > Notifications.
2. Select/create a notification.
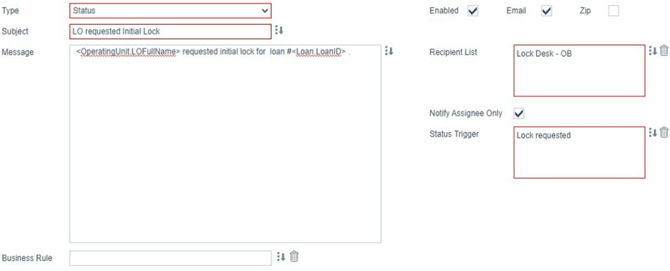
3. Select Type and enter Subject and Message (free form message or custom message).
4. Select Enabled and Email to receive notifications by email.
5. Enter the roles in the Recipient List field for these roles to receive notifications
6. Check Notify Assignee Only to notify only those roles assigned to the loan file, as opposed to all users that have the role.
7. Enter statuses in the Status Trigger field to list lock statuses that will trigger this notification email.
6. Lock Desk Configuration
1. Go to Configuration > Roles > Screens > Loan > Lock > Lock Confirm. 
2. Click the edit icon (![]() ) to create a custom button
) to create a custom button
3. In the Button Configuration lighbox, name the button OB Lock Desk.
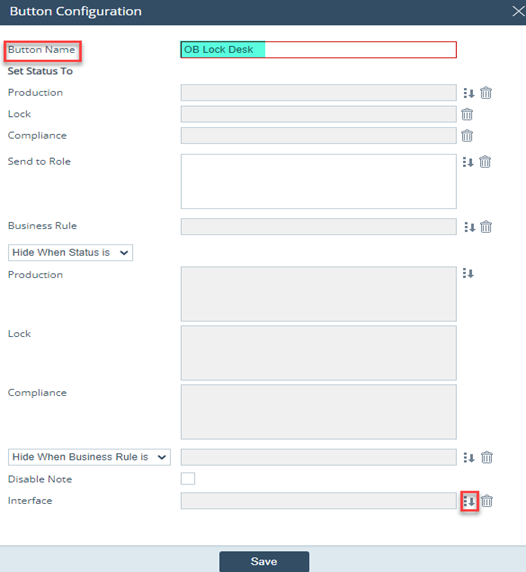
4. Click the select icon (![]() ) corresponding to Interface.
) corresponding to Interface.
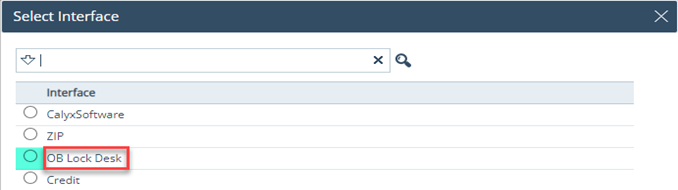
5. Select the OB Lock Desk.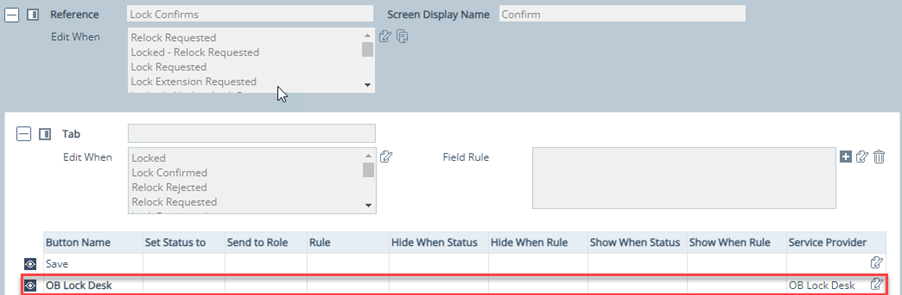
6. The OB Lock Desk button is now configured, as shown above.
7. On the Lock > Confirm screen, this button will take the lock desk user to the Optimal Blue website to confirm lock requests, as shown below.
![]()