You can create up to eight (8) customized screens in Point. Each screen can contain up to 25 fields of information.
Creating a custom screen
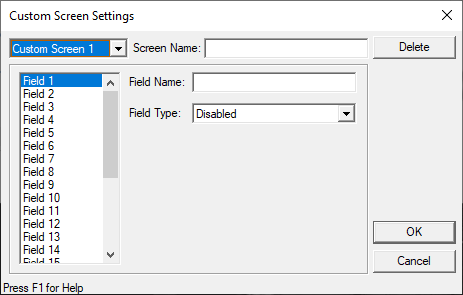
- Open Point.
- From the Menu bar, select Utilities > Custom Screen Settings...
- Click the dropdown for the Custom Screen number and select the screen you want to create or edit, such as, Custom Screen 1.
- In the Screen Name field: enter the name of the screen.
- In the left pane, click Field 1.
- In the Field Name field, enter a title for the first field on the screen.
- In the Field Type dropdown list, select the type of field you are creating. (For example: Select Text if you will enter text info this field or select Integer if you will use numbers for this field.)
- Repeat these steps for all fields you will create for the screen.
- To create another screen, select Custom Screen 2 from the left dropdown box and enter each field for the second custom screen.
- When finished, click OK.
- Close and open Point to load the custom screen changes.
- The Custom Screen can be accessed from any prospect or borrower file by selecting Forms > Custom Screens/Fields from the menu bar.