Auto File Naming allows Point to name files according to numerical parameters that you set. Each file is then saved as a loan number. This article contains instructions for enabling auto file naming for both Point and PointCentral.
Point
To assign a loan number or lender case number:
- Select Utilities > Auto File Naming > Prospect or Borrower.

- Select the Enable Auto File Naming check box.
- Specify the settings for your auto numbering scheme:
- Select the Use Prefix check box to preface account numbers with a fixed set of characters and enter those characters in the empty field.
- Select the Use Year check box to include the current year in the account number and specify whether you want a 1-digit, 2-digit, or 4-digit year format.
- Select the Use Month check box to include the current month in the account number and specify whether you want a 1-digit or 2-digit month format.
- Select the Use Day check box to include the day of the month in the account number.
- Specify the number of digits you want to include in the auto numbering counter. For example, selecting 3 would add a three-digit counter starting at 001 after the prefix and date; selecting 2 would start the counter at 01; and selecting 1, would start the counter at.
Click OK.
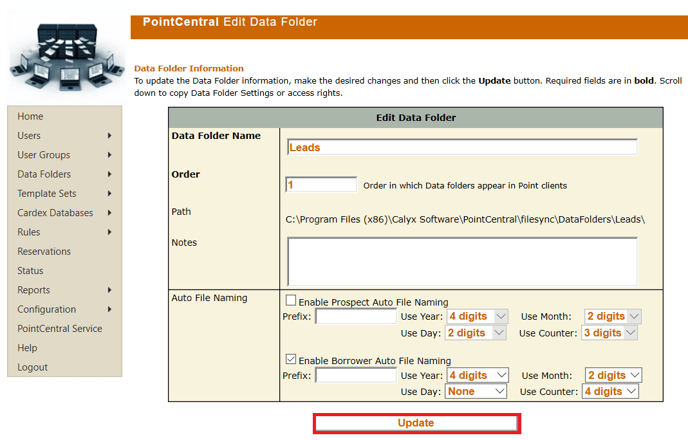
Enable Auto File naming for PointCentral
Contact your PointCentral Administrator
The Administrator will need to log into the PointCentral Administration website.
- Go to Data Folders > List Data Folders.
- Click Edit next to the folder to which you want enable auto file naming.
- Check the checkbox next to Enable Prospect Auto File Naming or Enable Borrower Auto File Naming and then click Update.
- The user will need to close and open Point and then next time they save a loan file, it will save as all numbers.
To save an existing file using the file naming scheme that you have set:
- Open the Point file.
- Click File > Save As.
- The filename will automatically set to the next file number - click Save.