You can export Point data to ACT by generating a report to list data from several Point files. The report can be exported to a text file and then imported into ACT.
Exporting data from Point to Act
- From the Navigation Panel, select Reports & Marketing.
- Select the report from the dropdown list.
- In the Status section, select the status of loans which will generate for the report or click [All].

4. Enter the Status Date Between:fields if you want to narrow the report results for loans within a specific time frame.
a. Click Generate.
b. After the report data appears, from the menu bar select File > Export > Custom ASCII.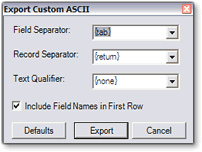
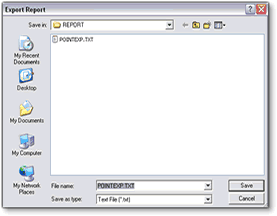
6. In the Export Report window, select a location and name the file.
Importing into ACT! (The following steps will be different depending on your version of ACT)
- Open ACT! 2005.
- From the Menu bar, select File > Import.
- In the Import Wizard, click Next.
- From the What type of file do you want to import? dropdown list, click Text Delimited.
- On the “File Name and Location" line, click Browse.
- Browse to pointexp.txt, then click Next.
- Select Contact Records Only, and click Next.
- Select the Field Separator.
- Click Tab, then click Next.
- Select Do not use a predefined map, and click Next.
The Data Import Wizard displays the information categories for the imported Point data.
- Map the data to a field in ACT! by clicking in the To this Field column. Click the dropdown list to select from the ACT! fields. Click Next.
- Click Next.
- Click Finish.
- The information from Point will merge into ACT!.