1904 Enabling Pipeline View
The pipeline view is similar to the loans view where you currently search for all your loan files. Loans are opened and sorted by using the same method; however, the only buttons on the Pipeline screen are Open and Remove from Pipeline.
In addition, the loan data that appears in the Pipeline view is different from the Loans search view. The pipeline view contains, but is not limited to, display the loan amount, note rate, cash to close, rate lock expiration date, conditions, and cleared conditions, when searching for a loan file.
How to Enable Pipeline View
- Open Point.
- From the left Navigation Panel, select the Pipeline tab.

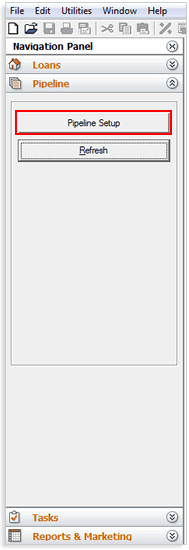
4. From the Pipeline Setup screen, check the box to Set Pipeline as Default View.
5. From the Data Folders section, select the data folders which contain the files that you want to appear in the Pipeline view.
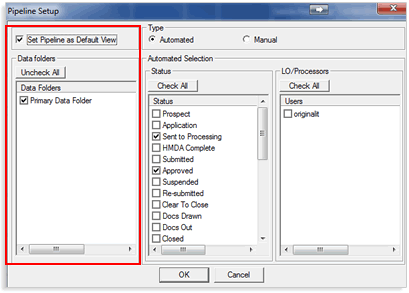
LO/Processors: Select which loan originators or processors files will appear in the pipeline search. Only loans that have a particular loan originator or processor selected will appear in the pipeline view. Leave blank to display loans for any loan officer but only display loans that have a current status as one of those that are checked in the Status section.
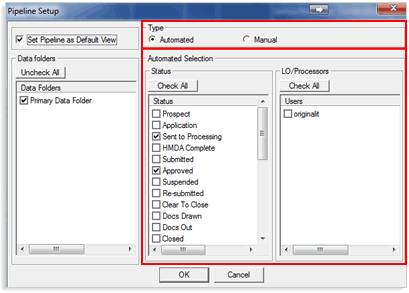
When Pipeline View is enabled, you have two methods of searching for loan files. You can use the normal search under the Loans tab to search through all your loan files or you can click the Pipeline tab and view only the loans that pertain to a particular loan status (that you selected from step 6 above) or loans that you manually added to the pipeline.
In this example, only loans that have a Sent to Processing or Approved status appear in the Pipeline View so I can see in a quick glance only the loans that have been sent to processing or approved vs. having to search through all my loans to locate the "sent to processing" or "approved" files.

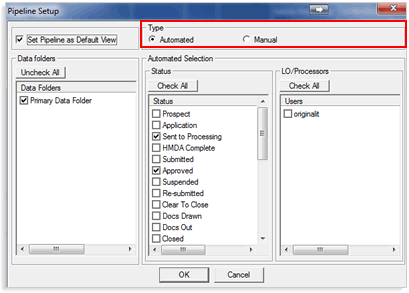
Selecting the Pipeline type as Automated vs. Manual
When the Pipeline Type is set as Automated, you can select the criteria which will determine the loans that appear in your pipeline. When Automated is selected, the Automated Selection section becomes available. Any status that you check in the Status section will determine which loans appear in the pipeline as well as the data folders and LO/Processors that you select.
(Please see instructions above)
When the Pipeline Type is set to Manual, you cannot select which criteria determines the type of loans that appear in the pipeline but rather you will need to manually add each individual file that you want to appear in the pipeline. (Please see instructions below)
Manually adding loans to the Pipeline View
Only use this section if you want to manually add loans to the pipeline rather than letting Point automatically add loans to the pipeline based on your selected criteria from the Pipeline Setup.
To set the Pipeline Type, complete the following steps:
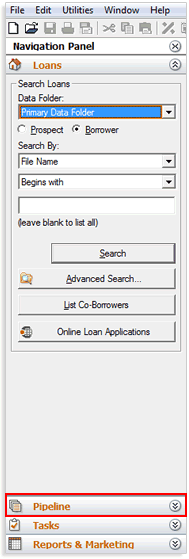
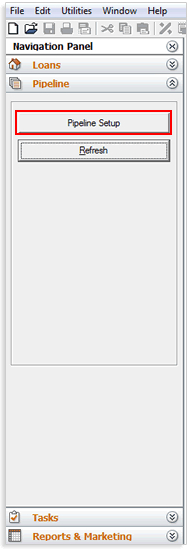
3. From the Pipeline Setup screen, check the box to Set Pipeline as Default View
4. From the Data Folders section, select the data folders to which you will enable pipeline view.
5. From the Type section, select Manual. In this case, we are selecting Manual because you are configuring the pipeline view to let you manually add loan files into the pipeline view rather than letting Point automatically group loans based on status.
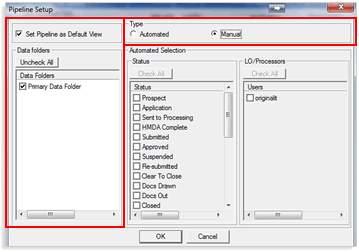
Click OK.
Click the Loans tab from the left navigation panel.
Any loan that you want to manually add into the Pipeline View, simply highlight the file and click the Add to Pipeline button.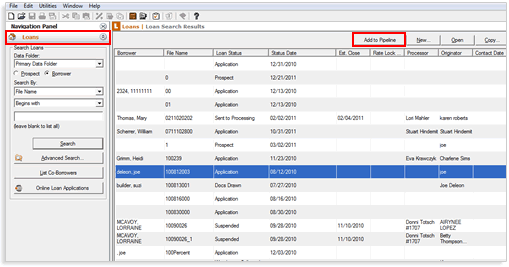
Then when you click the Pipeline button from the left navigation panel, any file that you selected to add to the pipeline will appear.
Removing loan files from the Pipeline View
Removing files from the pipeline view does not delete the file. The file will be removed from the pipeline view but still exist in your data folder and accessible when searching for loans from the Loans tab in the left Navigation Panel.
-
Click the Pipeline tab from the left Navigation Panel.
-
Highlight the file to which you want to be removed from the pipeline view.
-
Click Remove from Pipeline.

To locate a file that has been removed from the pipeline view, click the Loans tab from the left navigation panel and perform a search. Since removing the file from the pipeline view does not delete the file, it will still be available in the Loans search; it just won't be available in the pipeline view.