You can identify up to 100 additional fields that are not already included in supported fields or custom fields. Supported fields include all commonly used fields, Point built-in reports fields, and al report macros and custom screen fields. To view a complete list of all supported fields, log into your PointCentral Administration website and go to Configuration > Point Fields > Supported Fields.
You will need the field ID number to each field you are adding. You can load the field id's for each field by opening Point and from the menu bar, select Utilities > Load field ID > Borrower.
- Log into the PointCentral administration site. (Ex. https://mycalyxpds.com/admin)
- Go to Configuration > Point Fields > Additional Fields.
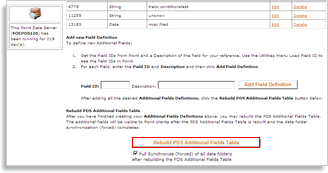
- Scroll to the Add a new Field Definition section.
- Enter the Field ID number that you are adding, which may have been displayed in the error message.
- Enter a Description and then click Add field Definition.
Full Forced Synchronization - Once the field definition has been added, you must apply a full forced synch to synchronize the new fields. (All users must exit Point before forcing a full synchronization)
- ALL USERS MUST EXIT POINT.
- From the PointCentral server, click Start > Run.
- In the Open field, enter services.msc, and then click OK.
- Restart the CalyxPDSFileSync service.
- Log into the PointCentral administration site. (Ex. https://mycalyxpds.com/admin)
- From the left navigation panel, go to Configuration > Point Fields > Custom Fields.
-
Uncheck the Full Synchronization... checkbox and then click Rebuild PDS Custom Field Table.
- From the left navigation panel, go to Configuration > Point Fields > Additional Fields.
It takes PointCentral approximately 1 minute per 1,000 files to synchronize. When it is completed, the users can log back into Point.