To prevent unauthorized users from selecting or clearing the Finalize HMDA data and lock screen check box on the HMDA Reporting screen, create a disable field rule to specify users who have access.
To create a disable fields rule:
- Log in to the PointCentral administration site.
- Create the rule.
The Add Rule screen is displayed.

The Edit Rule screen is displayed for the new rule.

The Definition section is expanded.

As you are typing, fields that match the entry are filtered from the list.
Important: Field ID 5183 corresponds to the Finalize HMDA data and lock screen check box. However, because the field name was changed in Point 9.7 and PointCentral updates don’t always coincide with Point updates, field updates can lag behind the Point updates. Therefore, the check box name will show as Final HMDA Loan Application Register (LAR) check box until the next PointCentral release.
See knowledge base article 3403 Creating rules in PointCentral for information about applying conditions to rules.
- Select Rules > Add Rule from the left navigation panel.
- Enter a name for the rule. For example, Disable Finalize HMDA data and lock screen check box.
- If you already have a rule with the same settings you want to apply to this rule, select it from the Copy From dropdown list.
- Click Add Rule.
- Enter details about the rule in the Description For example, Disables the Finalize HMDA data and lock screen check box for unauthorized users.
- Select Disable Fields from the Rule Type dropdown list.
- Enter 5183in the Disable Field dropdown list.
- When Final HMDA Loan Application Register (LAR) is displayed, select it and click to add it to the list of disabled fields.
- Specify whether you want the rule to run for both prospect and borrower files or only borrower files.
- Click the Add a Condition button to apply any conditions that must be in effect for the rule to trigger.
- Scroll down to the bottom of the screen and click Update Rule.
The Edit Rule Access screen is displayed.

To define access rights by a user, click the Add User Access Rights button.
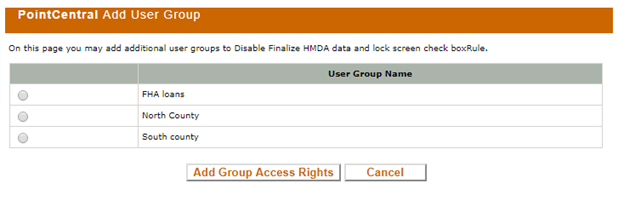
The Add User Group screen is shown in the following example.
In this case, select the user or group that will not be able to edit this field.
- Click the Edit User Access button after the rule is saved.
- To define access rights by a user group, click the Add Group Access Rights
- Select the user or group that this rule will apply to and click Add Group Access Rights(or Add User Access Rights).
- Repeat to apply additional users or user groups to this rule.
- When finished applying the rule to users and groups, test the rule in Point to ensure it works.
- If you did not give yourself access rights, the Finalize HMDA data and lock screen check box should be disabled.
- If the field is not disabled, verify the steps in this article to ensure the field is actually disabled and that you are logged in as a user the rule applies.
- Log in to Point as a user who you applied the disable rule.
- Select Track > HMDA > HMDA Reporting from the main menu.