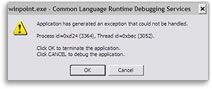
SYMPTOM
When you open or edit a custom screen setting you receive an error:
"Application has generated an exception that could not be handled. process id=... thread id=... Click OK to terminate the application. Click Cancel to debug the application."
CAUSE
When you edit a custom screen setting (such as making a change to a dropdown list), you can cause white spaces to appear in the custom screen files: custom1.csf, custom2.csf, custom3.csf, and/or custom4.csf.
RESOLUTION
Locate and remove the white spaces in the custom screen files located in the PNTTEMPL folder. (Check all custom screen files and correct the ones that are affected)
1. Close Point.2. From the Menu bar, select Start > Run.
3. In the Open field, type winpoint.ini, and click OK.
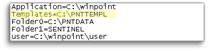
4. Locate the [Directories] entry and write down the path for the Templates= parameter.
5. Close the winpoint.ini file.
6. From the desktop, select Start > Run.
7. In the Open field, type the path you wrote down in Step 4, and click OK. The folder opens.
8. Double-click the custom1.csf file.
9. If you are prompted for a program with which to open it, click Select the program from a list and click Notepad, then click OK.
10. When you have opened the custom1.csf file, go to the top toolbar and click Edit.11. Click Select All. This highlights all the text.
12. Use the scroll bar to scroll up and down the document until you have located the lines that contain additional white spaces.
13. When you have located the extra white spaces, remove the entire section that contains them. (You will need to add the section back to the custom screen later)
14. Double-click the custom2.csf, custom3.csf, and custom4.csf files, and delete any white spaces that exist.
15. When you have corrected the affected areas of the custom screen files, you can open Point and work with custom screens
To add the sections, that were deleted, back to the custom screen:
- From Point, select Utilities > Custom Screen Settings, from the menu bar.
- Select the Custom Screen you want to edit.
- Add or edit any fields that you had to remove due to the whitespace.